To improve your Benchrest shooting accuracy and precision, one of the first steps is finding the bullet your barrel likes best. A key way to do this is by shooting a load ladder. In this blog post, Jason Stanley, Benchrest National Champion, explains how he shoots a load ladder.
Using a Load Ladder to Find the Best Bullet
I will first try to determine which bullet by shooting a load ladder. The main goal of the load ladder is to give me a good indication of which bullet the barrel likes best. Another benefit is that it gives me an idea on powder charge. Notice that there are no definitive answers given from the load ladder. It is simply the first step in a process to determine the correct load. In other words, the load ladder will point me in the direction I should look first.
Loading Up the Bullets
Range Day 1: 3-22-19 = 60 oF. 5-10 mph switchy winds, cloudy, no mirage.
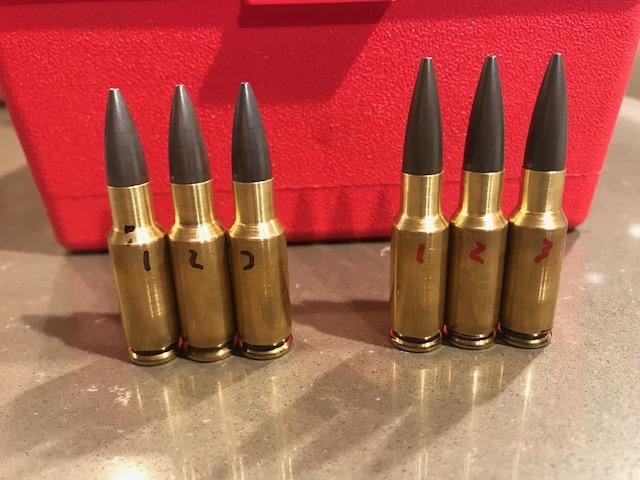
I loaded up eight rounds of each bullet with increasing powder charges all with CCI BR4 primers, seating depth of +.010, and a .324 bushing. (Important: each bullet had the same +.010 jam but that does not mean they both had the same cartridge overall length. The 118-10 has a longer C.O.L than the 112-7. Also, both the 112 and 118 bullets have an over-bullet measurement of .327”. When I use a .324 bushing that will give me .003 neck tension) I started the powder charge at 34.2 gr. and went up by .1 gr until I got to 34.9 gr. (34.2, 34.3, 34.4, etc). I also loaded up some sighter rounds just to get on paper. Since I had the time, I also loaded up three rounds of 34.5 gr. and three at 34.7 gr. with each bullet which will allow me to go to shoot some groups without making another trip to the range. More on those six rounds later.
Use a Loading Box to Stay Organized While Benchrest Shooting
Keeping all these cartridges organized is important. I have a loading box (pictured above) that is divided into sections. I keep the 112s on the left and the 118s on the right. The top section is for load ladders and the bottom section is for groups. The horizontal row at the bottom are my sighters used to make sure I am hitting where I want to hit on the target.
I also label each case with a sharpie. Black numbers are 112-7 and red numbers are 118-10. The number on the case correlates to the number on the pre-labeled target. I label the targets with all the important information needed to reproduce that round.
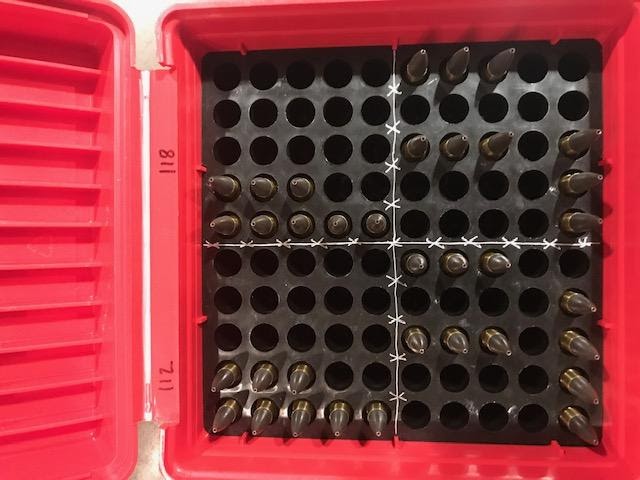
Picture of loading box to keep the shells organized
Case numbers correlate to the target number. Black are 112-7 and Red are 118-10
Keeping Track Of The Wind
I put out three wind flags, instead of the regular six that I use for 200 yards. I am trying to find the most forgiving load. In order to do that, I want to have just a general idea on what the wind is doing. In other words, I want a load that is going to allow me the greatest percentage of error while reading the conditions.
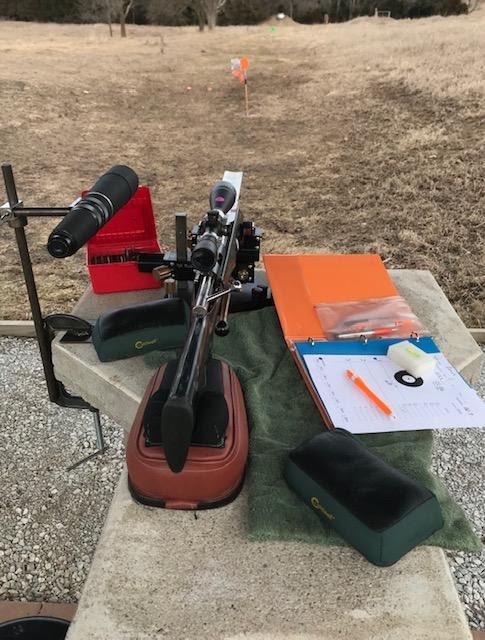
Picture of bench while shooting a ladder. Notice the identical target and spotting scope.
Shooting at a Sighter Target To Zero in the Scope
I first shot at a sighter target. For Benchrest shooting, the goal of the sighter target is simply to get my scope zeroed where I want it. I set my scope up so the impact point would be roughly two inches below my aiming point. Once I was done with that, I put up my pre-labeled load ladder targets. While holding at the same spot (center dot) for each shot, I would systematically shoot round #1 then look through my spotting scope to see where that shot hit. I would then mark the shot placement on my target at the bench. I continued through all eight rounds for that particular bullet then repeated the same procedure for the other bullet. I then retrieved my targets and marked which bullet holes belonged to which round on the actual target that I shot. Below are both targets for the 112-7 and 118-10 bullets.
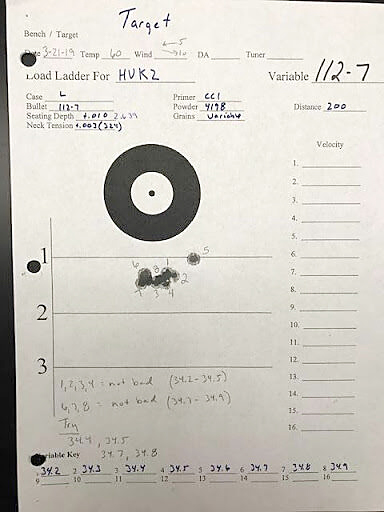
112-7 Load Ladder Target: Variable = Powder Charge
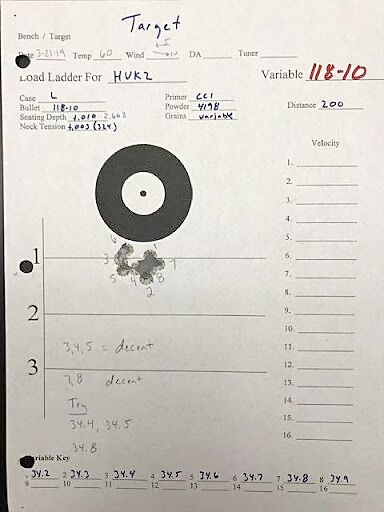
118-10 Load Ladder Target: Variable = Powder Charge
Analyzing the Sighter Targets For a Load That Groups Well
At first glance, the 112-7 have a more consistent-looking group than the 118-10. This is an indication that the barrel likes the 112-7 slightly better. (Note: shot #5 went up and to the right – since it was only one shot, I probably missed something in the conditions or bad table manners. Meaning it was not the fault of the load but rather the shooter) If you look more closely and follow the shots on the 118-10 target, they are more sporadic and spaced out. Shot one is way above shot two. Shot three is way to the left of those two shots, etc. The shots on the 112-7 target are more uniform and compacted. Shot one is next to shot two which is next to shot three, etc. This is another indication that the barrel is leaning toward the 112-7 side.
The targets also give me an idea of where to start looking for a load that will group well. The starting point for my groups will be where I have chronological numbers that are close to each other on the target. For example: On the 112-7 target, you will notice that shots 1,2,3,4 were all close to each other and shots 6,7,8 were decently close also. Based on this load ladder alone, I would try shooting groups with powder charges of 34.2, 34.3, 34.4, and 34.5 gr. I would also try 34.7 and 34.8 gr of H4198.
Up Next: Developing a Trend For The Best Powder Charge
In the next blog of this series, Jason discusses how he develops a trend for the powder charge and dealing with the inevitable days of poor shooting conditions. For an overview of this Benchrest shooting series, you can check out our first post on Tuning a Rifle Barrel.